

We’ve been really getting into Automator (for Mac) recently to reduce the time that boring and lengthy tasks take. Sometimes we can remove all of the strain out of these processes by setting up a simple workflow within Automator.
If you’re unfamiliar with Automator, it comes as standard with any Mac after 2012 and is a simplified version of Apple Scripts. This enables you to create simple and complex workflows out of functions within a drag and drop interface.
How does this help me?
Up until quite recently, we’d spend a significant amount of time playing around with images that website design clients sent us to reduce file sizes and make them website (and loading speed) friendly. Embarrassingly, we did this for quite some time before we got sick of dragging individual images into our editor, resizing them and then exporting them as .jpg’s.
This is when we turned to Automator, to try and create a new solution that would cut down on this time and allow us to spend longer on the website design aspects. By following this guide you can create an application that does all of this for you and take your new found knowledge further by applying it to other repetitive tasks you face during your website design (or other) projects.
Reducing image file sizes with Automator
This solution allows us to create an Application on our desktop. This in turn allows us to click and drag any number of images into the app and the application will automatically scale them to a maximum of 1080 pixels wide, convert each image to a .jpg file and rename the outputted file by appending “_resized”. As we said above, this is really useful if you download a bunch of stock images that are over 5000 pixels wide and in .png format or receive a folder of large images in camera format from a website design client.
Getting Started
Firstly you’ll want to open Automator (shock) and select “Application” in the menu that pops up. If you can’t find your application press CMD + spacebar to open up search and type it in.

Next, you’ll want to start creating your workflow.
[box type=”info”]Hint: Find each function quickly by using the search bar in the top left corner.[/box]
First drag “Copy Finder items” to the right and choose the folder where you’d like your images to be saved from the drop down box. If you want to preserve the original image leave “Replacing existing files” unchecked.

Now find “rename Finder Items” and drag it over. You’ll want to select “Add Text” from the dropdown and then type in the text you’d like added in the box. We’ve gone for “_resized” so an image titled landscape.png will be become landscape_resized.png.

After this we need to convert the image file size to .jpg to reduce the file size of .png images. Find “Change Type of Images” and select JPEG from the dropdown box.

The final step is to scale images down to more manageable dimensions, further reducing the file size. Find “Scale Images” and add it to the bottom of the workflow. Make sure the dropdown is set to “To Size (pixels)” and add your desired size. We’ve gone for 1080 in this instance.
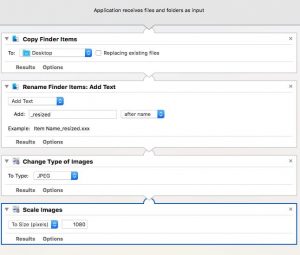
And that’s it! Just save your application to a location that you’d prefer. Now you can drag any images onto this application and see what happens!
Final thoughts

This is just a taste of what you can do with Automator and hopefully now that you’ve learnt how to create this workflow you might be inspired to try a few different things like collecting collecting email addresses automatically from websites and more. As always, if you’ve got any questions get in touch!