


If you’ve come across the Divi theme by Elegant Themes, you’ll know it’s packed full of useful time saving features as well as those that help take your designs to the next level. Whether it’s the ability to copy and duplicate layouts across pages, extend styles of sections, rows and modules in one click or the plethora of design features at your finger tips, it’s no surprise that it’s one of the most popular WordPress themes available.
One feature that may not be as fully understood and under-utilised is Divi’s dynamic content feature. In this post we are going to look at what dynamic content actually is and the different ways you can use this feature to extend your creative opportunities.
What is dynamic content?
Divi’s dynamic content feature allows for you to create design templates that are populated dynamically and automatically via back end fields. This means you no longer need to duplicate layouts and manually input data. In plain English, this allows you to do things like creating a standard blog or portfolio layout which is populated with your different posts and projects. Going further you can also create custom layouts for pretty much any post type, such as Woocommerce products, creating new possibilities for your design and workflow.
Setting up dynamic content using Divi’s visual builder
At it’s very basic level, it’s quite easy to use the dynamic content feature within the Divi visual builder (please note – dynamic content does not as yet work in the back end builder). Simply open up any module, navigate to the content section and look for this symbol:

Clicking on this will allow you to choose content that you’d like that module to display dynamically. If you’re working in the visual builder within a post then the list of options will all relate to a post (e.g. the excerpt, the content, the title, post meta etc), whereas if you’re working within a project then the list of dynamic content options will relate to the back end fields for projects.

This is where many get confused and give up as they cannot find how to add the correct dynamic content fields to certain layouts. This is probably the only downside to the way that Divi’s dynamic content works, as if you choose to start building in the visual builder of a Divi Library Layout, you’ll not be able to select the fields for a post or page. The solution is to always build in a new page or post of the post type you want to create for. Once you’ve finished the layout and design you can simply save as a layout which will allow you to replicate the formatting to every post you’d like to apply it to.
If this sounds a little confusing fret not, as we’ll be going through how to do this below.
Creating a portfolio layout with Divi’s dynamic content
To begin creating a portfolio layout using Divi, we first need to create a new Project. Once we’ve added a title to the project we can click through to the visual builder. Since we’re only interested in teaching you how to add dynamic content in Divi for this post, we won’t bother creating a pretty format. Obviously when you’re doing your own project layout the design can be completely your own.

When in the visual builder it is simply a case of putting together your layout as normal, but instead of manually typing in any text or image content we can select the symbol in the top right of the content box and select the field we want to display.

Once we have selected our chosen field, we can choose whether we want to add anything before or after the content is outputted. This is particularly useful if we want to display a price – in this instance we’d be placed a currency in the before box (£ or $). It’s also really useful for adding html tags to our content. For instance if you’re adding dynamic content for a title you might want to add <h*> and </h*> tags into the before and after box and enable HTML content.

In this example we’re simply outputting the project title at the top of the page followed by the featured image and the post content. Pretty simple stuff.

Once you’re happy with your format, save and return to the back end editor and save the design as a Divi Layout. Now every time you create a new project, simply load the layout, fill in the required fields and your project will be automatically formatted on the front end.

Extending Divi’s dynamic content with advanced custom fields
Now that you are familiar with how to create dynamic layouts and populate them automatically via back end fields, you may be wondering how you can make these more flexible. Fortunately we can rely on the popular plugin Advanced Custom Fields to help us accomplish this.
Advanced Custom Fields allows us to add new fields to the WordPress backend, alongside those that you’ll be familiar with such as the content box, excerpt and title. This is fantastic as it allows us to add fields for literally anything – think about adding a “delivery information” box that we could apply to our Woocommerce products, or a “last updated” field that allows us to display when we last updated a page or post – the possibilities are endless.
Fortunately for us, Divi plays really nicely with ACF and allows us to include these custom fields in our layouts. In this example we’ll look at how we can populate a Divi tab module for a Learndash course linked to a Woocommerce product. This approach will work with any post type, whether you want to extend the functionality of a blog post or series of pages instead.
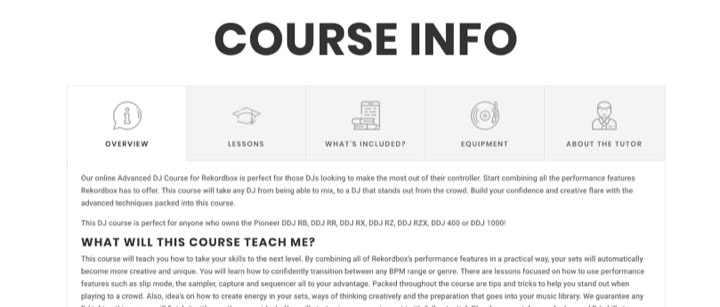
View our tutorial on how to style your tab module like this.
How to do it
Start by downloading and activating Advanced Custom Fields. Once installed you’ll see “Custom Fields” in the WordPress menu.
Firstly, we need to add a new Field Group – this is basically just a group of fields that you can assign to specific post types (e.g. posts, projects, products etc). Once you’ve named your field group, and before adding any fields, scroll down to the “Location” section. This is where we can specify where our custom fields will appear. For this example we’ll first be selecting “Layout” since we’ll be building the end design in the Divi layout library. Second we’ll need fields to appear on our product pages so we’ll click “Add rule group” and add “Product” too.

Once we’ve set the location we can start adding some fields. In this example we’ve ignored the main content box in the WordPress backend and instead split the course description into several chunks (e.g. Overview, What’s Included and Equipment etc) as well as chosen to display some other content. This will involve a total of 6 fields that we’ll use to display different pieces of information in our product layout.

It’s simple to add new fields and you only need to really worry about 3 options. First set a label for the field, then select what field type you require. For this example we only need to use a “text” field or the “WYSIWYG editor”. Finally just make sure that the “Required?” option is disabled since if you leave any fields empty you won’t be able to publish or update your posts, which is annoying.

Now that we’ve added all of the fields we need we can go to the Divi library and create a new layout. Once you’ve given it a name and clicked through to the visual builder, you’ll be able to create different modules as normal and specify where you’d like the custom fields to output.
If we continue our example, we’ve created and styled a Divi tab module in the visual builder (we got here by creating a new layout in the Divi library and clicking through to building on the front end). We can now go into each tab and rather than manually entering content we can click the symbol and select our custom field as our content.


Once we’ve saved our changes we can close the visual builder and visit a product page and we can see that our content nicely populates our tab module!
This approach will work in many instances – you can create custom fields for images and use these as dynamic content to populate images and even background images on the front end. If you spend some time going through the field type options of ACF you’ll find that there are many useful field types for you to take advantage of.
Limitations
Now you know what is possible, what are the limitations? There are a few instances where Divi doesn’t handle dynamic content and if you spotted it earlier, our video link field is one instance. Here we’d like to dynamically show an iframe video from Vimeo per product however the Divi video module cannot accept a custom field no matter which way you try it. Fortunately ACF comes to the rescue once more with it’s ability to output field content via a shortcode.

ACF shortcodes
In the circumstances where Divi won’t accept a custom field as content, we can fall back on the available ACF shortcodes. You can learn more about them here, but crucially all we need to know is that they follow this format:
[acf field="name"]
All you need to do is change the word “name” to the name of your field (note this isn’t the label, but the field name that appears below when adding a new custom field).
In this example, we’ve used an ACF shortcode to insert a YouTube iframe into our product page. All we have to do is copy the embed code (from YouTube) into our back end field like so:

If we’re super clever, we can now create a text module and copy in the shortcode of the field in the backend. This screenshot shows you how you might want to set up the text module if you were embedding a YouTube video:

Once we’ve done this, all our client needs to do is copy share embed code into the backend field and it will automatically add the video into our layout on the front end – easy!
On a final note, if you are interested in how we created our overall custom Woocommerce layout, we recommend that you look at a Divi extension such as the Woocommerce builder for Divi.
And that’s about it!
Divi’s dynamic content feature is a really powerful piece of functionality that can be taken even further with the use of ACF. If you’ve got to grips with utilising the visual builder to take advantage of this you may wish to begin learning how to edit theme files to output custom fields dynamically too. Keep an eye out for our future post that will cover this topic. As always, if you have any questions please leave a comment or get in touch.


