Most websites that you visit will have some form of map to show visitors their business location. Although there are a number of ways to accomplish this, the most popular is via the Google maps API.
Prior to recent Google API changes, it was simple for a website developer to create APIs within their own accounts for use with client websites. However due to the fact that a billing account is now required, more and more clients are choosing to create and supply these API credentials themselves.
So if you are developing your own website or have been directed here to create an API key for your ongoing website design project, here are the steps to enable one.
Step 1 – Visit the Google API Console
The first step involves visiting the Google API Console where you can access the range of Google APIs on offer. To access the console, simply visit this link: https://console.cloud.google.com/apis/ and sign in with your existing Google account/sign up for a new account.
Step 2 – Create a new project

Once you’re signed in you’ll be redirected to the Google API dashboard, which looks a little empty at the moment. To access and enable your Google maps API you’ll first need to click “CREATE”.

This will lead you to another screen whereby you can name and give your new project a location. If you have a number of APIs you need to create then we suggest naming them something relevant and obvious. If you only need a single API for maps then you don’t really need to worry about changing anything on this page. Once you’re happy, click the blue “CREATE” button.
Step 3 – Enable the API within your project

The next step involves enabling the maps API within the new project you have just created. Once you have created a project you should be redirected to the “APIs & Services” page (if not, find API & Services within the left hand menu and click Dashboard in the sub menu).

When you’re on this screen, click “ENABLE APIS AND SERVICES” at the top. You’ll now be faced with many tiles, each representing a different API that you are able to enable. You can ignore all of these and find “Maps Javascript API” and “Places API” as these are the only APIs we need to access to allow maps on our website. Either scroll or search for these APIs and click on them. On the next screen, simply click the blue “ENABLE” button.

Step 4 – Add your billing details
The Google maps API used to be free for all to use however recently Google began to require billing details to enable this API. Before you’re able to access any keys or credentials you will need to enter your billing information.

Before you worry that you’ll be charged excessively for using this API, if you are just using your map to dynamically show a drop pin of your business, this service remains free (Google just requires your debit/credit card on file). Even if you are styling your map, using street view or utilising route directions (these require additional APIs too!) then you can still load the map 100,000, 28,000 and 48,000 times respectively using the free credit that Google requires.
To put it simply, you will not get charged if you are just using the API to display a map with your business on.

Getting back to the tutorial, once you’ve enabled the API you’ll be taken to the API dashboard which shows metrics about your usage. At the bottom right you’ll see “GO TO BILLING”. Clicking this will prompt you to “Link a billing account” and you will follow a simple process to enter your card information.
Step 5 – Getting your API credentials

Finally, once you’ve added billing information you’ll be taken back to your project dashboard. Find the “APIs & Services” tab in the left hand menu and select “Credentials” in the sub menu.
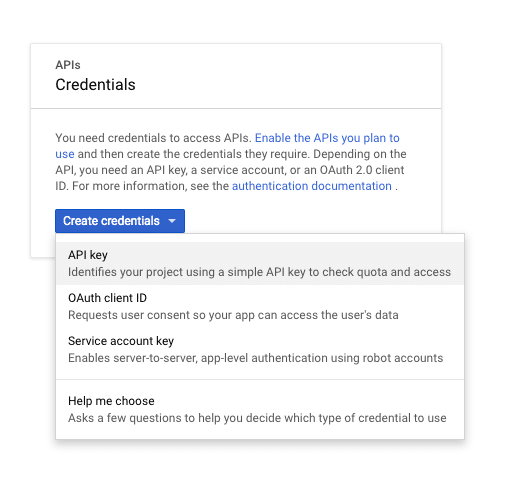
On the next screen, click the blue “Create credentials” button and select the first option “API Key”. Clicking this will prompt a pop up showing your brand new API key. Simply copy and paste this API key somewhere safe and ready to use.
This is the key you will need to add to your website or provide to your web developer to integrate a dynamic map into your website.
Final thoughts
We hope this has been a relatively straight forward process. If you’ve encountered any difficulties then please do let us know, we’ll be happy to help.